If retail coupons mean business to either you or your clients, then Apple’s digital wallet app, Passbook, has more than likely caused a little commotion. Being able do away with printed scraps of paper is one thing, but having offers that are both time and location aware may really change the game.
We’ll take a look at how you can use PassKit’s Pass Designer to create a simple coupon that can be delivered by email and saved to a recipient’s iOS device. Now that over 35% of email opensoccur on an iOS device, Passbook may well be the next big thing in retail and email marketing.
The brief
 Lets say that you run a local restaurant called ABC Burgers. You have an active subscriber list of in-store signups, who love receiving special offers and discounts via email. You’ve also noticed that many of these savvy customers don’t like bringing in printed coupons and clippings as much as they like using their iPhones.
When Apple released Passbook, they also released a great opportunity to not only reduce the amount of paper waste that coupons were creating, but market to customers in unique ways, with location-aware, limited-time offers.
The end goal – a coupon that can be emailed to customers, then brought in-store to redeem a 2-for-1 burger deal. You don’t mind if your coupons are distributed freely as passes, so there’s no need to lock them down with serial numbers or passwords. Imagine, after hitting send on your next newsletter, the queues for burgers will be wrapping around the block in minutes.
Adding passes to your chef’s arsenal
 So first of all, what is a pass? The skinny is that it’s a ‘virtual card’ that can be used to replace conventional loyalty, rewards and membership cards, coupons, tickets (like Eventbrite does) and more. The idea is that designers and developers like yourself can create these passes, then distribute them amongst users with Apple devices running iOS 6 or higher. Unlike physical cards, you can also update and manage passes remotely. For example, you can automatically revoke passes from all devices, or update them as your terms and conditions change.
Passes are double-sided – on the front, you can add important details, like a promotion summary, customer name, or membership number. On the back, a physical business address is mandatory, but there’s plenty of space for terms and conditions and any other legal mumbo jumbo.
The great news is that there are already services like PassKit or PassSource that do not require special development or design skills to whip together a simple, static coupon (although these always help). Both services allow you create free, highly customizable passes from your browser.
We’ll be using PassKit’s Pass Designer, as it makes understanding and editing Passbook passes just a little easier for first-timers like ourselves. This is just a demo – if you want to issue passes commercially, you will need purchase a certificate via an Apple developer account ($99 per year).
Cooking up a simple pass from scratch
First, a caveat – PassKit is undergoing heavy development, so a lot of what we’re about to mention here is likely to change. But given that their Pass Designer is fairly straightforward, you’ll probably find your way through just fine. So, back to the story – we have a pass to create for our 2-for-1 burger deal. Before we get started, we’ll need:
- An icon for our pass (at least 116px wide)
- A logo image (at least 100px wide)
- A ‘strip image’ to display on the pass (at least 624px wide)
- The promotion’s validity dates, plus any terms and conditions
With this in hand, it’s time to visit Passk.it and follow the prompt to create Passbook passes. The editor will load and first ask you what kind of pass you wish to create. Select ‘Coupon’, fill in a meaningful name for your pass and a description (eg. ‘2-for-1 burgers’). Leave the serial number settings as-is – we won’t be using the barcode, anyway. Finally, you can also opt to have the pass display on the lock screen at a set date and time – we’ll cover how to trigger these notifications when the device is close to a specific location in just a moment.
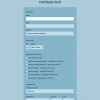
Now, on to the ‘Colors and Images’ step, where we’ll upload all the images specified earlier and set a color scheme. Here’s what this looks like:

Once satisfied, we can move on to the ‘Front Content’ tab. Here, you can add some text for the front-side of your pass, like ‘2-for-1 Burger Deal’, expiry dates and more. If you add any items, make sure they’re set as ‘Static’, so they can’t be changed by users. Keep in mind that the logo and any text at the top will be what’s displayed when the pass is displayed in a deck of multiple passes in Passbook.
On the ‘Back Content’ step, the only mandatory item is a physical business address (as we mentioned earlier). However, if you have terms and conditions, this is the place to add them.
 Things get more interesting on the ‘Locations’ step. Once you enter an address and find the corresponding latitude/longitude, you can create a short notification which will appear when a device with the pass is in range. A message like ‘2-for-1 burgers – come in now!’ will do.
If you are creating a pass in English only, you can skip the ‘Language’ step. Otherwise, you can provide translated text and graphics for dozens of languages.
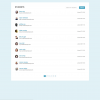
On the final ‘Distribution’ step, you can select to issue a finite number of passes, ensure they stop getting distributed after a certain date and most importantly, get the Pass URL for our email. Remember to hit the ‘Save Pass’ button before moving onto sharing this link around.
If all has gone well, your Pass URL should go to a pass like this one. Try downloading it to your iOS device and viewing it in the Passbook app – good times. You can update the pass in the editor and the share link will remain the same.
Sending passes to your subscribers
So, you’re happy with your pass and have a Pass URL handy. Now all you have to do is pop it in an email newsletter.

The Pass URL is no different to any other link, so you can add it to text or an image in ourtemplate builder, to your HTML code, or to an autoresponder. Once done, test and send as you would a regular email campaign. With the coupon out in the wild, you can visit your PassKit account to view basic reports, or simply arm yourself with a burger flipper and brace yourself for the hungry hoardes!
A last bite
Well, this has been a simple account of what goes into creating a basic coupon for Passbook – to go large, you may still require a designer and you most certainly will need an Apple developer account. But if you think about it, we’ve covered a lot of ground here – not only have we created a coupon that can be sent to countless subscribers, but we’ve made it location-aware and easy to update at any time. With a taste for the creative opportunities that Passbook and email deliver together, we hope you’re inspired to bring your own sophisticated campaigns to the table.
How are you or your clients planning to use Passbook? We’d love to hear about your ideas in the comments below.